*Great use for stale Fruit Loop Cereal!*
Place cereal into ziploc bag. Remove air. Seal.
(Depending on age of child, have them sort the colours into different bags)
Crush with rolling pin.
Give child large piece of paper and white glue. Let them draw a design with the glue on the paper. Show them how to sprinkle the cereal glitter onto the glue (could use extra spice shaker, medicine cup, small spoon, etc)
Shake extra cereal off of paper into baking pan (to be reused on next picture) or into garbage.
Showing posts with label Crafts. Show all posts
Showing posts with label Crafts. Show all posts

19.10.10
The Very Busy Spider Craft Activities
Next week we are reading "The Very Busy Spider" by Eric Carle at Toy Library as it is my daughters turn to bring in a favourite book. One of his many fabulous books. We will be doing a craft afterwards and here are some of the fabulous ideas I have found or thought of.

SPIDERS:
Egg Carton Spider: a cube cut from a cardboard egg carton. Painted black or coloured with markers or covered in tissue paper that is glued on. Poke in pipe cleaners for legs and glue on googly eyes. Easy peasy!


SPIDERS:
Egg Carton Spider: a cube cut from a cardboard egg carton. Painted black or coloured with markers or covered in tissue paper that is glued on. Poke in pipe cleaners for legs and glue on googly eyes. Easy peasy!

Bottle Cap or Lid Spider: Using a jar lid or bottle cap, glue on legs & googly eyes. Can't get much simpler!
Styrafoam Ball Spider: Styrafoam balls painted black. Pipe cleaners poked in for legs and googly eyes glued on.
Handprint Spider: Have child dip hand in black paint. Place on paper to make two handprints together so they meet at the wrist. Put on eyes.
Thumbprint Spiders: Place child's thumb in ink and press onto paper in several spots. Let child draw legs & eyes on spider. Could also do this onto a web.
PomPom Spider: Two different sized pom poms glued together with pipecleaner legs & eyes.
Sure couldnt live without those googly eyes! they are a staple in our craft supplies and get reused when a craft gets tossed.
WEBS:
Glittery Web: Draw a web on a piece of paper. Let child trace with glue. Sprinkle with glitter and shake off excess. Glue on a spider - either made by child or cut out by adult for them to glue on.
Laced Web: Styrafoam plate with holes punched along edge. Let child "sew" the web by placing yarn through one hole and then pulling through a hole on opposite side of plate and then back to the other side etc. Or they can put through random holes for an abstract web.
Marble Web: Place black or dark paper in bottom of cardboard box. Place a few small dobs of white glue sporadically on paper. Place a marble on the paper and gently roll to create a beautiful white web.
Painted Web (with string): Put a long length of string into a puddle of paint. Coat string thoroughly. Pull string out and lay in random pattern on paper. Move string to create the web look you want. Remove string. Your fabulous web now needs some spiders - thumbprint spiders look great!

this pic done with the string painting & thumbprint spiders
*************************
One of the above spider crafts would look great on these webs!
4.6.10
Toddler Craft - Funny Faces


my daughter likes making these cute little faces right now. She helps draw the head by tracing around a lid and then glues on the eyes, pompom nose, and shredded tissue paper. Completes by drawing a little mouth. The green one is at the bottom of a Birthday Card she made.
Toddler Summer Craft: Fishy Feet

Fishy Feet craft for Toddler:
Trace your childs feet. Let child glue to paper and decorate with eyes, glitter, tissue paper, etc.
27.5.10
Spring/Summer Picture
Create a Spring or Summer Picture using paints, muffin liners, grass (either the Easter Grass or cut from paper), Popsicle Sticks, and Buttons.
Take large sheet of construction paper. Have child paint top half blue (for sky) and bottom half green (for grass). Paint a few popsicle sticks (for flower stems) green. Let Dry.
Flatten a large muffin liner and glue a smaller muffin liner inside. Glue to a painted popsicle stick. Glue a button into center of small muffin liner.
Glue green grass to bottom of picture.
Glue popsicle stick flowers to picture.
Paint or glue on a sun in the sky.
Complete!
Take large sheet of construction paper. Have child paint top half blue (for sky) and bottom half green (for grass). Paint a few popsicle sticks (for flower stems) green. Let Dry.
Flatten a large muffin liner and glue a smaller muffin liner inside. Glue to a painted popsicle stick. Glue a button into center of small muffin liner.
Glue green grass to bottom of picture.
Glue popsicle stick flowers to picture.
Paint or glue on a sun in the sky.
Complete!
22.3.10
Canadian Wind Sock Craft
Supplies needed:
A cylindrical cardboard box (like from oatmeal or ice tea or hot chocolate)
Construction paper (red and white)
Red and white crepe paper streamers
Glue
String
Scissors
Hole punch
Cut the bottom off a cylindrical cardboard box.
Let child glue on red and white construction paper to look like the background of the Canadian flag. Cut out a small red maple leaf and glue it on the white central part of the windsock.
Cut some red and white crepe paper streamers and glue or staple them to one end of the wind sock.
Punch four holes along the top of the wind sock.
Cut two pieces of string about a foot long. Tie the strings to the wind sock (tie the opposite ends of a string to holes on opposite sides of the cylinder).
Tie a longer piece of string to the smaller pieces - you'll hang the wind sock from this piece of string.
Hang it up!
Supplies needed:
A cylindrical cardboard box (like from oatmeal or ice tea or hot chocolate)
Construction paper (red and white)
Red and white crepe paper streamers
Glue
String
Scissors
Hole punch
Cut the bottom off a cylindrical cardboard box.
Let child glue on red and white construction paper to look like the background of the Canadian flag. Cut out a small red maple leaf and glue it on the white central part of the windsock.
Cut some red and white crepe paper streamers and glue or staple them to one end of the wind sock.
Punch four holes along the top of the wind sock.
Cut two pieces of string about a foot long. Tie the strings to the wind sock (tie the opposite ends of a string to holes on opposite sides of the cylinder).
Tie a longer piece of string to the smaller pieces - you'll hang the wind sock from this piece of string.
Hang it up!
14.2.10
Valentine Craft: Collages
Collages are a great craft for toddlers as they don't need help and can glue/colour to their little hearts content.
For Valentine's Day, any craft items in red or pink will be perfect!
Items such as:
buttons, pom poms, stickers, ribbons, hearts cut from artwork or flyers, confetti, and then of course crayons, markers, paints, stamps, glitter glue, etc. are all a necessity!


The collages make great Valentine gifts for family members too!
*I cut out pictures from greeting cards after they've been kept for a few days and they can be used for future collages. For example, I will cut out some pictures from some of the cute Valentine's Cards she received and we'll use them!
For Valentine's Day, any craft items in red or pink will be perfect!
Items such as:
buttons, pom poms, stickers, ribbons, hearts cut from artwork or flyers, confetti, and then of course crayons, markers, paints, stamps, glitter glue, etc. are all a necessity!


The collages make great Valentine gifts for family members too!
*I cut out pictures from greeting cards after they've been kept for a few days and they can be used for future collages. For example, I will cut out some pictures from some of the cute Valentine's Cards she received and we'll use them!
8.2.10
Valentine's Day Holders - some from Recycled Items!
Decorated Enveolope: 
Last year, my daughter was at her sitter's for Valentine's Day. She gave the kids each a red or pink envelope and the kids decorated with various stickers. Then the kids gave out their Valentine's and stuck in their envelopes. Great for a small group or those too young for any intense crafting! (I save envelopes that we receive cards in if they are not sealed shut - even if there is a name on the card it can easily be covered with a sticker! Great way to reuse)
Cereal Box Card or Treat Holder:
Cut a cereal box in half. Cut the front half a bit lower than the back so that the contents are partially shown. Cover in paper or paint. Decorate with anything! (glitter, ribbons, stickers) This holder would be one that stays home for the kids to store and look through their valentine's afterwards. (Other boxes that would work well would be from Instant Oatmeal, Bisquick, Crackers, etc - check out your pantry!)


 (some blogs will show you the perfect finished craft -obviously done by Mom- I prefer to show my daughter's perfect work of art :-)


Last year, my daughter was at her sitter's for Valentine's Day. She gave the kids each a red or pink envelope and the kids decorated with various stickers. Then the kids gave out their Valentine's and stuck in their envelopes. Great for a small group or those too young for any intense crafting! (I save envelopes that we receive cards in if they are not sealed shut - even if there is a name on the card it can easily be covered with a sticker! Great way to reuse)
Cereal Box Card or Treat Holder:
Cut a cereal box in half. Cut the front half a bit lower than the back so that the contents are partially shown. Cover in paper or paint. Decorate with anything! (glitter, ribbons, stickers) This holder would be one that stays home for the kids to store and look through their valentine's afterwards. (Other boxes that would work well would be from Instant Oatmeal, Bisquick, Crackers, etc - check out your pantry!)


 (some blogs will show you the perfect finished craft -obviously done by Mom- I prefer to show my daughter's perfect work of art :-)
this one made from a crystal light box covered in paper with pipecleaner handle and decorated with stickers. It was a craft for our Valentine's lunch at a restaurant so it needed to be a clean craft with no glue, markers, etc. The stickers kept her and the other kids busy for a little while - they all loved it!
Felt Bag Necklace/Purse:
Create a felt bag that can hang around your childs neck or use as a purse. Cut out two rectangles of red or pink felt. Glue or Sew three edges - leaving top end open for the cards to go in. Cut out other heart shapes and let child glue onto bag. Could also be decorated with puff paint or glitter glue. Attach long piece of ribbon or yarn for the handle.

Create a felt bag that can hang around your childs neck or use as a purse. Cut out two rectangles of red or pink felt. Glue or Sew three edges - leaving top end open for the cards to go in. Cut out other heart shapes and let child glue onto bag. Could also be decorated with puff paint or glitter glue. Attach long piece of ribbon or yarn for the handle.

Heart Jar for Candies or Candles:
Cut out one or various sized hearts from contact paper. Stick to a clean jar, vase, or candle holder. Let child paint the jar in various shades of red or pink or white (use paints made for glass). Once dry, remove the contact paper! (could be done with a clean spaghetti, salsa or pickle jar! cover the lid in fabric to hide what it had previously been used for)
Paper Plate Card Holder:
Cut one paper plate in half. Glue or staple it facing to the bottom of anot her paper plate. Decorate with stickers, paints, markers, etc. An older child could lace the two plates together. With plates facing each other, punch holes with hole punch an inch apart along the plates. Use thick red or pink yarn (with end wrapped in masking tape) to lace together.
Recycled Candy or Card Holders:
Decorate any type of container to store the treats or cards. Items such as tall potato chip cans, hot chocolate containers, boxes from pastas/cereals/crackers etc., margarine tubs, cappucino tins, baby formula cans, etc! Earth friendly and crafty!
Cut out one or various sized hearts from contact paper. Stick to a clean jar, vase, or candle holder. Let child paint the jar in various shades of red or pink or white (use paints made for glass). Once dry, remove the contact paper! (could be done with a clean spaghetti, salsa or pickle jar! cover the lid in fabric to hide what it had previously been used for)
Paper Plate Card Holder:
Cut one paper plate in half. Glue or staple it facing to the bottom of anot
 her paper plate. Decorate with stickers, paints, markers, etc. An older child could lace the two plates together. With plates facing each other, punch holes with hole punch an inch apart along the plates. Use thick red or pink yarn (with end wrapped in masking tape) to lace together.
Recycled Candy or Card Holders:
Decorate any type of container to store the treats or cards. Items such as tall potato chip cans, hot chocolate containers, boxes from pastas/cereals/crackers etc., margarine tubs, cappucino tins, baby formula cans, etc! Earth friendly and crafty!
Toddler Valentine's Day Crafts
This Love Bug was made by my daughter at our local Toy Library - a very quick and easy craft for her. Have child colour a toilet paper tube red. Glue on two red hearts at back. Create a face. In this case they had one cut out for her to glue on but googly eyes and a pom pom would be cute too.


Heart Collage - Using flyers, magazines, scraps of my scrapbooking papers, and construction paper, I will cut various sized hearts and let her glue onto a large piece of paper.


I will cut out four large hearts and two small hearts for her to make a Heart Flower Picture. The four large will make the flower petals when glued with the points together. The two small will be leaves for the flower. A pipe cleaner, green construction paper strip, or ribbon will make the flower stem. The child can either colour the petals and leaves or use coloured paper. Glitter could also be added after its all glued down. (I wouldn't count on this one looking like a perfect flower but that's how everyone will know that she created it!)
Last year we made some cute Salt Dough Heart Ornaments. There were various sizes and became necklaces, key chains, and desk ornaments for friends and family.
Valentine's Day Cards will be made with folded construction paper (one sheet will make two or four cards) and then decorated with heart stickers and either markers or paint. Could also glue on hearts cut from felt or fabric or scrapbook paper scraps. You could also cut out hearts from the construction paper, decorate them, and give those out for the child's friends.
**Craft Decoration Idea:
Using one of your child's many works of art, draw hearts of different sizes on the back. Cut out the hearts and your child can now glue them onto whatever Valentine's craft they are creating!
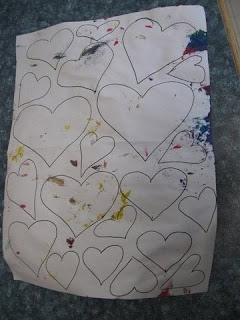


I drew up some quick and inexpensive Colouring Pages for my daughter to colour and provided her with some red, pink, and purple crayons. These sheets will hang on our art clothesline for a few days and then get mailed to some special relatives. (don't feel you aren't talented enough, a page with a few hearts and some phrases to colour are all that is required)

Heart Collage - Using flyers, magazines, scraps of my scrapbooking papers, and construction paper, I will cut various sized hearts and let her glue onto a large piece of paper.


I will cut out four large hearts and two small hearts for her to make a Heart Flower Picture. The four large will make the flower petals when glued with the points together. The two small will be leaves for the flower. A pipe cleaner, green construction paper strip, or ribbon will make the flower stem. The child can either colour the petals and leaves or use coloured paper. Glitter could also be added after its all glued down. (I wouldn't count on this one looking like a perfect flower but that's how everyone will know that she created it!)
Last year we made some cute Salt Dough Heart Ornaments. There were various sizes and became necklaces, key chains, and desk ornaments for friends and family.
Valentine's Day Cards will be made with folded construction paper (one sheet will make two or four cards) and then decorated with heart stickers and either markers or paint. Could also glue on hearts cut from felt or fabric or scrapbook paper scraps. You could also cut out hearts from the construction paper, decorate them, and give those out for the child's friends.
**Craft Decoration Idea:
Using one of your child's many works of art, draw hearts of different sizes on the back. Cut out the hearts and your child can now glue them onto whatever Valentine's craft they are creating!
(Great way to recycle some of the artwork that is piling up!)


2.1.10
Snowman Crafts
I love snowman and like having various creations around the house. We did some before Christmas as part of our decorations but it is a craft we can continue in the new year as well.
Cupcake Liner Snowman -
Let child flatten some cupcake ( or specialty chocolate) liners (a couple in different sizes would be great). G
lue in a snowman shape onto construction paper.
Glue on items for the face and clothing.
To create the look of snow falling, put small daps of glue throughout paper and some on snowman. Let child sprinkle white glitter on the glue drops.

For a hanging mobile version:
Using the cardboard backing, put a hole on top of largest circle. A hole on top and bottom of medium circle and one on bottom of smallest circle.
Use string, twist ties, etc to attach circles to create the snowman.
The child could even decorate the back of the snowman in the same manner so that it can twist and turn with the air movement.

SNOWMAN ACCESSORIES:
Fabric Scraps
Felt pieces
Buttons
Feathers
Foam Stickers
Construction Paper
Wool / Yarn
Bottle Caps
Ribbons
Cupcake Liner Snowman -
Let child flatten some cupcake ( or specialty chocolate) liners (a couple in different sizes would be great). G
lue in a snowman shape onto construction paper.
Glue on items for the face and clothing.
To create the look of snow falling, put small daps of glue throughout paper and some on snowman. Let child sprinkle white glitter on the glue drops.

Cotton Ball Snowman -
Cut out two or three circles from paper (could even use the cardboard from a cereal box for a sturdy recycled version).
Let child either dip their cotton balls in glue and apply on circles OR let child paint glue onto circles and then place cotton balls on glued area.
For a picture:
glue circles on paper and then let child decorate with an assortment of odds and ends.
Glue on items for face and clothing.

Cut out two or three circles from paper (could even use the cardboard from a cereal box for a sturdy recycled version).
Let child either dip their cotton balls in glue and apply on circles OR let child paint glue onto circles and then place cotton balls on glued area.
For a picture:
glue circles on paper and then let child decorate with an assortment of odds and ends.
Glue on items for face and clothing.

For a hanging mobile version:
Using the cardboard backing, put a hole on top of largest circle. A hole on top and bottom of medium circle and one on bottom of smallest circle.
Use string, twist ties, etc to attach circles to create the snowman.
The child could even decorate the back of the snowman in the same manner so that it can twist and turn with the air movement.
Chalkboard Snowman -
Glue on snowman shapes & accessories onto black paper. Let the child use white chalk to create snowflakes!

SNOWMAN ACCESSORIES:
Fabric Scraps
Felt pieces
Buttons
Feathers
Foam Stickers
Construction Paper
Wool / Yarn
Bottle Caps
Ribbons
1.1.10
Toddler Christmas Craft - Tin Pie Plate Stars
In researching some ideas of what to use my aluminum pie plates for in a toddler craft, I came across a great idea to use next Christmas!
Cut stars out of the center of the pie plates. Punch a hole in the top and hang several in the window at varying lengths.
Perhaps the toddler could help decorate them with glue and glitter.
Cut stars out of the center of the pie plates. Punch a hole in the top and hang several in the window at varying lengths.
Perhaps the toddler could help decorate them with glue and glitter.
17.12.09
Easy Toddler Craft for the Birds
Help toddler thread cheerios, pretzels and other such items onto pipecleaners.
Bend into loops.
Create several to have a chain.
Hang outside where the child can watch the birds eat their creation!
Bend into loops.
Create several to have a chain.
Hang outside where the child can watch the birds eat their creation!
Winter Suncatcher

Using a metal pie plate, have child put an assortment of small colourful toys, beads, buttons, etc inside.
Lay ribbon or string so that it will be able to hang the suncatcher once frozen
Fill to brim with water.
Remove from pan and hang outside near window.
*Perhaps a Nature version too - using pinecones, pine needles, rocks, twigs, leaves, etc.
Lay ribbon or string so that it will be able to hang the suncatcher once frozen
Fill to brim with water.
Remove from pan and hang outside near window.
*Perhaps a Nature version too - using pinecones, pine needles, rocks, twigs, leaves, etc.
Christmas Craft: Gingerbread Man

1. Cut out a large gingerbread man shape.
2. Let child decorate with a variety of items like:
glitter glue (my child's favourite!)
sequins
buttons
crinkly paper
googly eyes
pom poms
pipe cleaners
bits of fabric or felt
markers, crayons, etc.
15.12.09
Recent Christmas Craft Creations

artwork done with crayons & glitter glue framed

decoupaged white tissue paper onto a clear vase (great for gifts)

toddlers hands and foot make this reindeer's shape

markers on a wooden ornament

foam stars decorated with glitter glue and hung from the ceiling

finger painting on green construction paper, then covered in glitter glue, cut into tree shape, and buttons added as ornaments. Foam star glitter glued and then glued on top.

Gingerbread house made with square graham crackers, icing, and assortment of candies (m&m's, smarties, gummie bears, pretzels, coconut, raisens, marshmallows)
7.10.09
Halloween Crafts
Ive been searching for some ideas on Halloween Crafts to occupy my 2 year old. These will also be used to decorate the house.
Collage: I copied clip art from http://www.office.microsoft.com/ onto a Word document and printed out. I cut out the various pictures and will let her glue them onto some orange paper.

Puzzle: One piece of clip art I enlarged to the size of a full sheet of paper. I printed out and cut into six equal squares for her to reassemble.


Jack o Lantern on a Stick: Let them paint a paper plate with orange paint. Give them shapes cut from black construction paper to glue on. Glue a popsicle stick to the back of the bottom part of plate. Or forgo the stick and hang with string.
*Make five varied sizes & expressions of Jack o Lantern on a stick and use to recite the commonly known poem (see below)
Terra Cotta Pumpkins: Use any desired size of terracotta pot and let child paint orange. Then draw on a face.
PUMPKIN POEM:
The fourth one said, "Let's run, let's run!"
COOKIES! Going to find a yummy sugar cookie recipe, add some red/yellow food colouring and make pumpkin shaped cookies.
Halloween Garland: Cut out several halloween shapes (Ghosts, Bats, Pumpkins, etc) either by drawing the shape or using clip art or downloading various templates available on the internet. Punch a hole in the top of each. Let the toddler help thread them onto string or yarn and hang in entranceways, windows, etc. *Using cardstock may help this be reusable*
Halloween Gingerbread House: A mini version using one square graham cracker per wall, one for the floor and two for the roof. Decorate with candy corn shingles and other various candies. Yum!
Collage: I copied clip art from http://www.office.microsoft.com/ onto a Word document and printed out. I cut out the various pictures and will let her glue them onto some orange paper.

Hanging Decorations: Some of the above clip art I enlarged and cut out. I cut large squares of cardstock (a bit bigger than the clip art) and let her glue the pictures on the front and back. Create a hole in top and hang with string.


Puzzle: One piece of clip art I enlarged to the size of a full sheet of paper. I printed out and cut into six equal squares for her to reassemble.


Colouring Pages: There is lots available to print. Google "printable colouring pages" or draw your own simple picture for them to colour.
Jack o Lantern Candle Holder: Using bits of orange tissue paper, let child glue onto small jar or votive holder. (Reuse old jars from salsa, pickles, etc.) Apply a layer of glue on top. Use a black marker or glue pieces of black felt for jack-o-lantern face.
Jack o Lantern Candle Holder: Using bits of orange tissue paper, let child glue onto small jar or votive holder. (Reuse old jars from salsa, pickles, etc.) Apply a layer of glue on top. Use a black marker or glue pieces of black felt for jack-o-lantern face.

*I let her do the glueing & sticking orange paper on and then I obviously did the face*
Jack o Lantern on a Stick: Let them paint a paper plate with orange paint. Give them shapes cut from black construction paper to glue on. Glue a popsicle stick to the back of the bottom part of plate. Or forgo the stick and hang with string.
*Make five varied sizes & expressions of Jack o Lantern on a stick and use to recite the commonly known poem (see below)
Terra Cotta Pumpkins: Use any desired size of terracotta pot and let child paint orange. Then draw on a face.

PUMPKIN POEM:
FIVE LITTLE PUMPKINS
Five little pumpkins sitting on a gate.
The first one said, "Oh my it's getting late!"
The second one said, "There are witches in the air."
The third one said, "But we don't care."
The fourth one said, "Let's run, let's run!"
The fifth one said, "Isn't Halloween fun!"
Then Woooooooo went the wind
And OUT went the lights.
And five little pumpkins rolled out of sight.
Egg Carton Spiders: Using cardboard egg carton, cut out a few individual cups. Let child paint black. Poke holes in cup for child to stick black pipecleaners through for legs. Glue on googly eyes. Poke hole in top to hang. (Do several and hang at various lengths)
Salt Dough: Create pumpkins and ghosts for decorations or magnets.
Salt Dough: Create pumpkins and ghosts for decorations or magnets.
COOKIES! Going to find a yummy sugar cookie recipe, add some red/yellow food colouring and make pumpkin shaped cookies.
Halloween Garland: Cut out several halloween shapes (Ghosts, Bats, Pumpkins, etc) either by drawing the shape or using clip art or downloading various templates available on the internet. Punch a hole in the top of each. Let the toddler help thread them onto string or yarn and hang in entranceways, windows, etc. *Using cardstock may help this be reusable*
Halloween Gingerbread House: A mini version using one square graham cracker per wall, one for the floor and two for the roof. Decorate with candy corn shingles and other various candies. Yum!
Pumpking Carving: I'll cut out the top lid and loosen all the innards from the sides. Then give her a spoon and let her scoop!
* She was quite grossed out by the feel of all the seeds & goo and seemed to enjoy touching in & cringing *
3.9.09
Recycling and Upcycling Children's Artwork
Great gifts & ideas for any occasion
(and keeps the clutter to a minimum!)
Mail to various relatives (especially those without children)
Cut & fold into envelope shape. Affix address with a label. What a funky piece of mail to receive!
Make a calendar from your home printer
Take a picture of artwork and using website (like Walmart or other similar one) upload to use on:
mug, mouse pad, calendar, greeting cards, notepads, tote bags, and anything else they will put a photo on
Cut up artwork into strips or squares and let child glue onto paper for a newly designed piece of artwork - or put onto a greeting card!
Cut into squares, punch a hole in corner for a gift tage
Mat and frame the artwork
Wrapping paper
Cut up into strips for bookmarks: laminate or glue onto cardstock. Punch hole in top and thread yarn through.
Create greeting cards
Laminate for use as a placemat
Transfer or trace onto fabric then embroider and make tea towels, napkins, quilts, sachets, and small pillows
Cut into puzzle pieces and let child put it together again
Decoupage it onto any wooden, metal or glass items (wood tray, a box, a frame, a set of drawers, metal can, cardboard can (like from hot chocolate), glass votive holders, glass canisters, etc.
Cut into squares to make a memory matching game
Glue to wooden shape or cardstock and place magnet on back
Cut into strips to make a linked chain garland.
Print on fabric to use for: pillows, quilt squares, sachets, appliques, pot holders, fabric coasters, tea towels, tote bags, and aprons
Cover a blank book or journal
Use artwork (or photo of it) in place of the photo on a photo keychain
************************
Taking pictures of the artwork is a great way for storing them without taking up the space they normally would!
************************
25.8.09
Christmas Gifts for a Toddler to Make
Ive started to give some thought as to what my toddler can make for her relatives for Christmas. These ideas could also be used for Birthdays too of course.
Christmas Ornaments
recipe for salt dough: http://123mytoddlerandme.blogspot.com/2009/08/salt-dough-recipe.html
Picture Frames (either standing or magnet variety) Unfinished wooden frame that can be painted.

Christmas Ornaments
recipe for salt dough: http://123mytoddlerandme.blogspot.com/2009/08/salt-dough-recipe.html
Picture Frames (either standing or magnet variety) Unfinished wooden frame that can be painted.
Bingo dabbers would make a funky polka dot design. Or perhaps decoupage with tissue paper, construction paper, magazine or catalogue pictures, old Christmas Cards, or even photographs.
Tote Bag - Canvas Bag and Fabric Crayons.
Haven't used these before but apparently the child draws on the bag (or shirt) with the crayons, then you iron the design with a piece of wax paper on top. Follow the directions on the crayon box since the directions may vary according to the brand.
Hot Trivet - Ceramic Tiles that are painted by the child and then clear coated with varnish. Glue felt on bottom to prevent scratched tabletops.
Vase - Clear Vase that is decoupaged (glue & paint brush - she'll love it!) with tissue paper.
I have many styles of clear vases that I find boring (I prefer coloured vases because I don't like seeing the stems) and will give away once decorated as presents. I'll make sure I get one for Christmas too! :-)
Candle Holder - same idea as vase - decoupage tissue paper onto candle holder. My 2yr old made this for her Grandma's birthday:

Magnets - Using wooden shapes, let child paint or colour. Stick a magnet on back. Another option: cut a tree shape from green felt. Let child help glue to cardboard or cardstock. Let child glue on small buttons or beads for the tree decorations. Glue a magnet to the back.
30.6.09
Canada Day Flag

Materials:
White Paper (thicker is better, like cardstock)
Red Paint
Wooden Skewer or Dowel
Cut paper into rectangle
I let my daughter fingerpaint awhile on some paper and when her hands were covered thoroughly in paint, I borrowed her hand to make a handprint. I let her help paint the sides of the paper red so it resembles a Canadian Flag
I placed the wooden skewer along the edge and folded the paper over the skewer, glueing it into place.
We will proudly carry this at tomorrow's festivities!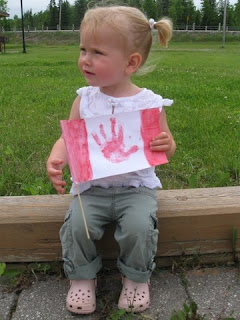

8.6.09
Items to Paint?
* Paper (use the artwork for birthday cards for the grandparents or other relatives!)
* Large smooth Rock

* Large piece of Birch Bark
* Wooden Items (birdhouses, small boxes, picture frames, etc.)
* Cardboard containers (like those Hot Chocolate is in with plastic lid)
* Large pieces of paper to use to wrap gifts
* Lampshade (buy a used one and let kids have a hand at helping to decorate their room)
* Terracotta Pot
Using Special Glass Paints:
* Clear Glass Plate ( paint on underside of plate )
* Glass Jar (could be used for candy, cotton balls, change, etc.)
* Large smooth Rock

* Large piece of Birch Bark
* Wooden Items (birdhouses, small boxes, picture frames, etc.)
* Cardboard containers (like those Hot Chocolate is in with plastic lid)
* Large pieces of paper to use to wrap gifts
* Lampshade (buy a used one and let kids have a hand at helping to decorate their room)
* Terracotta Pot
Using Special Glass Paints:
* Clear Glass Plate ( paint on underside of plate )
* Glass Jar (could be used for candy, cotton balls, change, etc.)
Subscribe to:
Posts (Atom)