30.6.09

Canada Day Flag


Materials:

White Paper (thicker is better, like cardstock)

Red Paint

Wooden Skewer or Dowel

Cut paper into rectangle


I let my daughter fingerpaint awhile on some paper and when her hands were covered thoroughly in paint, I borrowed her hand to make a handprint. I let her help paint the sides of the paper red so it resembles a Canadian Flag

I placed the wooden skewer along the edge and folded the paper over the skewer, glueing it into place.


We will proudly carry this at tomorrow's festivities!
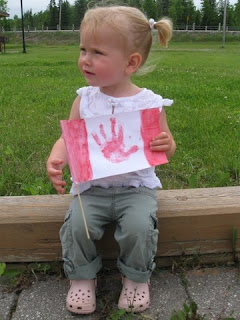
20.6.09

Peanut Butter & Banana Pancakes

I wanted to give my daughter a breakfast different from her usual few items. Pancakes aren't really a healthy breakfast so I thought this would improve its nutricious value.

*This is the recipe off the Bisquick box with a few changes*

2 cups Bisquick Mix
1 cup Milk
2 Eggs
2 Mashed Bananas

Mix all together. Heat griddle (Grease if needed). Pour 1/4cup batter in. Wait for the bubbles and then flip. A minute more (approx) and they are done!

Spread pancake with Peanut Butter and fold in half. Cut into triangles for an easy sandwich-style pancake!

My daughter loves them. For my husband and myself, we use the same batter but then do the tradational syrup & butter and it's still yummy!


Another Healthy Pancake idea is to slather with cream cheese (with a bit of icing sugar & vanilla mixed in), load on the berries, and roll up. Yum!

19.6.09

Homemade Birthday Banner

In planning my daughter's Eco-friendly birthday party, I decided to make a banner that I could re-use for the next few years. I already had piles of felt that had been purchased over the years for various projects that had either not happened or not needed as much as purchased.

Materials:
Hot Glue Gun & Glue Sticks
Cord
Felt - various colours
Scissors


I went with yellow & white pennants as those were the only colours I had enough of in full sheets of felt. (I would have liked to used multiple colours for the penants but wanted to use up what I already had)


I cut out a triangle from one felt sheet and then used it as a template for all of the other triangles. I got three triangles from each sheet of felt.

I drew out the letters on various coloured felt pieces, cut them out, and hot glued them with the ink side down.

To add some more colour to the banner, I used some more triangles and added colourful circles to them. I used these before "Happy" and between "Happy Birthday" and at the end.


The easiest sewing-free way to hang them I thought would be to make little tabs and thread the cord through. Like a tab-top curtain panel would have.

It turned out great and I can't wait to start using it!

16.6.09

Recipe: Frozen Yoghurt Popsicle

1 1/2 cups flavoured Yoghurt
1 Banana
2 T Apple Juice

Mash Banana into the Apple Juice. Mix in the Yoghurt. Pour or spoon into popsicle molds.

*I always favoured grape koolaid popsicles as a kid but these are pretty yummy too and much healthier!*

8.6.09

Items to Paint?

* Paper (use the artwork for birthday cards for the grandparents or other relatives!)

* Large smooth Rock

* Large piece of Birch Bark

* Wooden Items (birdhouses, small boxes, picture frames, etc.)

* Cardboard containers (like those Hot Chocolate is in with plastic lid)

* Large pieces of paper to use to wrap gifts

* Lampshade (buy a used one and let kids have a hand at helping to decorate their room)

* Terracotta Pot


Using Special Glass Paints:

* Clear Glass Plate ( paint on underside of plate )

* Glass Jar (could be used for candy, cotton balls, change, etc.)

5.6.09

Painting Tools & Textures

Put a dab of paint on a plate. Add a squirt of dishwashing soap (for increased washability) and let them try these items for some interesting effects!

.
Potato Masher

Q-Tips


Bingo Dabber ------>

Drinking Straw (for making circles - not drinking the paint!)

Cookie Cutters

Toothbrush

Sponge

Toy Car (drive through the paint to make tracks!)

Thread Spool


Toothpicks


Twigs


Wild Flowers ------->


Stones


Acorns


Leaves


Feather


Hands, Fingers, Feet!


Also try food items as stamps:


Corn on the cob

1/2 Potato (Mom can carve into various shapes for fun stamps too)

1/2 Apple


1/2 Red or Green Pepper (obviously the colour doesn't matter!)


1/2 mushroom


Add to Paint for Texture:

Sand

Sawdust

Cornstarch

Flour

18.5.09

Playdough Colour Options

Tempura Paint Powder
Liquid food colouring
Paste food coloring
(available in cake decorating stores, or section of craft store). They look more expensive than liquid, but you use tiny amounts to get great colors. They last for years.
Kool-Aid (unsweetened) for color and scent


GLITTER for sparkly playdough.

*************
Let the kids discover how colours are created by giving small balls of playdough.
One white ball, one green - what do they make?
One blue ball, one red - what do they make?
Etc.
*************

Playdough Recipes

** All are inedible ** - but not toxic

Store any version of playdough in an airtight container to ensure a longer lifespan.

Here are various recipes that I have compiled, depending on what ingredients you might have on hand.

*See separate post for ideas on Playdough Tools around your house.

COOKED PLAYDOUGH:

#1
1 cup flour
1 cup of water
1/2 cup salt
2 tablespoons cream of tarter
1 tablespoon of oil

Cook ingredients until they form a blob in the pan. Pour it out into a plastic container. Cover with damp cloth. Add food coloring if desired.


#2
1 cup water
1 cup salt
1/2 cup flour
Food coloring

Mix ingredients in pan. Add food coloring. Stir on low heat. When it thickens remove from heat. Put some on waxed paper or floured surface and roll out. Cut out objects. Air dry objects few days.


#3
1 cup baking soda
1/2 cup corn starch
3/4 cup water

Mix the baking soda and corn starch in a pot. Use hands to make sure all the lumps are broken up. Add water. The adult should put the pan on the stove over medium heat and stir constantly. As soon as the mixture gathers together, remove from the heat. When it cools, have your child knead it into a smooth playdough.
Note: Don't over cook this playdough or it will crumble when the children use it.


UNCOOKED PLAYDOUGH:

#1 (Coffee Scent!)
4 cups unsifted all purpose flour
1 cup salt
1/4 cup instant coffee
1 1/2 c warm water

Dissolve the coffee in the warm water. In another bowl, mix the flour and the salt. Make a well and add 1 cup of the coffee water into it. Mix with a fork or with your hands until smoother. Add more coffee water as needed: dough should be smooth not sticky or crumbling.


#2
1/4 cup salt
1 cup flour
1/4 cup water

Have your child mix the flour and salt in a bowl then add water. Knead and squeeze the dough to make a clay consistency. You may need to add more water.
Note: Your child will find that this playdough doesn't last as long as the cooked recipes.


#3
1 cup cold water
1 cup salt
2 teaspoons vegetable oil
Tempera paint or food coloring
3 cups flour
2 tablespoons cornstarch

In bowl, mix water, salt, oil, and enough tempera paint or food coloring to make a bright color.
Gradually add flour and cornstarch until the mixture reaches the consistency of bread dough.

17.5.09

Activities While Staying at Someone's House


It is such a challenge to keep a toddler busy when you are staying at someone's house.
If they have kids then it is much easier as the kids will occupy your toddler and they'll have toys your child has never played with.

If there are no kids where you are staying - good luck! Even if I cart a whole lot of toys along, she will be more interested in all the new surroundings - including knick-knacks, books, souvenirs, and anything else that she shouldn't play with.

We're going to my father-in-laws next week. He's 86 and not fond of his granddaughter getting into everything. I'm desperately trying to figure out which toys & activities will keep her occupied the most.

He lives in Winnipeg so one afternoon will be spent at the Zoo and should be lots of fun for all of us. Another activity will be the Children's Museum at the Forks.

I've packed the following toys:
- crayons & coloured paper
- a few small blocks
- stacking cups (good for bath, sand, or livingroom play)
- baby doll with bottle, cup, spoon, dish, blanket)
- small ball
- many books (that I put away a few weeks ago)
- small etch-a-sketch
- cellphone

So what else can take up some precious time and keep her out of trouble??
  • Water Play at sink or with a bucket on the balcony
  • Sidewalk chalk (we have no cement in our yard so she should enjoy this I hope)
  • Colouring
  • Playground - hope to find one nearby
  • Indoor Swimming Pool
  • Paint with Water Book
  • Paint Brush and cup of water for outside painting of deck or concrete. (see pictures below)
  • toddler friendly websites such as

http://www.fisher-price.com/ and http://www.kidscomjr.com/ and http://www.noggin.com/ and www.nickjr.com


*this kept her busy for a good hour the first time I let her try it. she had fun "painting" everything in sight*

12.5.09

Homemade Chunky Crayons - Recycling!

My Aunt found a big bag of crayons at a second hand store, so I went to work at making the chunky toddler crayons I have heard about.

1. Peel off all paper from crayons (kids might enjoy this task!)

2. Cut into small chunks
3. Prepare Pan.

Muffin Tin: use an old one because it will get wax on it and surprisingly it is very hard to remove it all afterwards. Or purchase one from second hand store.

On my first batch, I put pieces of tin foil in each cup (I have heard you can buy muffin cup liners made of foil but haven't seen them). 7 out of 9 cups had wax leak underneath the foil and make a mess. Plus the crayons turned out very wrinkly due to the creases in the foil. * Not recommended unless you use the aluminum liners but I didn't try that.


Second batch, I sacrificed my muffin tin since it already had wax on it from the first batch. I sprayed it liberally with cooking spray. * This worked the best.


4. After preparing pan, pile your crayons chunks. I liked to stick to 2 - 4 colours per cup and grouped each colour together.

5. Turn oven to 250F (no need to preheat, this isn't a cake we're making!) and put muffin tin in. It took about 10 mins. Even if not all the chunks were melted, I turned the oven off and left it inside for awhile.

6. Remove from oven and let cool on counter. When they started to solidify, I stuck them in the freezer. An hour later they popped out so easily.


Option 2: Film Canisters - Place film canisters in a baking pan lined with a piece of tin foil to catch drips. Using a tin can, melt your crayons in the can by placing it in a saucepan with an inch or two of water on the stove. Stir the chunks (wooden skewer worked great) until melted. Pour carefully into film canisters. Some of them I layered a few different colours for a cute effect.

*Unless you want to use a dozen different cans, start with your lightest colour and then reuse for the next darker colour. This way the leftover wax in the can won't distort your colours too much.


Finished product from Film Canisters

Finished product from aluminum foil lined muffin tin.

Finished product from greased muffin tin & my Favourites!

These crayons will be used in the loot bags for my daughter's birthday party and the less pretty crayons will be used at home & our cabin.
I read somewhere that the washable crayons don't work for this. Whatever makes the washable will rise to the top and the kids won't be able to colour with them. Since my crayons were a mixed assortment of unknown brands, I made sure to use some of each type in a muffin cup.
I really enjoyed the project and couldn't stop once I started creating my little masterpieces!

4.5.09

Loot Bags

I made these mini drawstring bags this weekend for the loot bags at my daughter's upcoming birthday party. Im doing a 'green' theme so these are more environmentally friendly than the tradional plastic dollar store variety.

I used scraps of fabric that I have saved over the years and found instructions on the internet.

It was so super easy (I am not an advanced sewer). The instructions were for a certain sized bag but I just 'winged it' with my own sizes depending on the size of scraps I had.

Im hoping the kids (& Moms) will enjoy these and use them for storing little cars, snacks, doll accessories, whatever!

I enjoyed making them (since they were so quick & easy) and made extras of various sizes for myself. Im thinking that perhaps future gifts will be encased in a homemade drawstring bag as well!

27.4.09

Summer Outdoor Fun

SIDEWALK CHALK PAINT:
- liquid food coloring
- box Corn Starch
- water
- 8 oz individual containers for each color

- Measure 1/4 cup cornstarch into each cup.
- Add 1/4 cup water to each.
- Drip in 5-10 drops of food coloring.
- Stir it up.
At first it will seem as though the cornstarch just won't mix in, but all at once it comes together.
- Add more color for intense colors, less for pastel shades.

Pre test on the driveway, fence, and brick to see if paint will come off - It should though.


ICE TREASURE:
Using a ice cream pail, put a small amount of water in bottom.
Add treasures. Freeze.
Add another layer of water, add treasures, freeze.
Add another layer of water, add treasures, freeze. Etc.

All these layers will ensure treasures throughout the ice block rather than them all frozen on the bottom.

Treasures:
Marbles, stones, shells, coins, plastic animals, etc.

Put in a shallow plastic bin and let the kids excavate their treasures using toothbrushes, spray bottle, eye droppers, spoons, etc.

Great cool activity for hot summer day!


Frozen Paint:
Water down some paint, pour into ice cube trays. Lay foil over top and poke toothpicks through to act as holder. Freeze.
Let kids hold their paint cubes and paint their pictures outside.

ICE CUBES: coloured or plain, they’re fun to watch melt

Bathtub Paints

2T liquid soap
1T cornstarch
Food Colouring (just a drop, mix, then see if you need more)

Mix up and put in ice cube trays.
This will float in the tub and they can fingerpaint!

if they dunk it in the water, the paint gets too watery and won't be easily applied with fingers - perhaps a paint brush would still work though.

Edible Peanut Butter Playdough Recipe

1 cup Peanut Butter (smooth)
1 cup Milk Powder
1 cup Oats
1/4 cup Honey

Mix all together!

(Makes enough for 3 kids to have a good size chunk to play & snack)

If you are tempted to add more dry ingredients, STOP! It needs to be a bit sticky and once it's all mixed thoroughly it won't stick to your hands.

**
This is my favourite edible playdough recipe. The majority of peanut butter playdough has icing sugar for the second dry ingrediant (rather than oats in this one) and since Peanut Butter is made up of lots of sugar, that is just way too much for my little one. This one is healthy and still quite yummy - trust me cause I like to eat it too!

link for ideas on tools & accessories with edible playdough: http://123mytoddlerandme.blogspot.com/2009/04/playdough-tools-from-around-house.html

26.4.09

Bubble Recipes & Tools

My daughter loves bubbles!

During the winter months, we enjoy bubble blowing during bath time. Now that spring has finally arrived, we'll be heading outdoors with them!

RECIPE:
1/4 cup liquid dishwashing detergent

1/2 cup water
1 Tbsp. sugar
Put the dishwashing detergent in the water. Carefully stir in sugar trying to avoid suds.


RECIPE:
1/4 cup sugar

2 quarts warm water
3/4 cup liquid detergent (Joy or Dawn)
Mix 1/4 cup sugar with 2 quarts of warm water. Stir until sugar is dissolved. Add 3/4 cup liquid detergent.


Recipe Tip: Be careful not to whip up small bubbles while mixing!


Bubble Tools:
- Plastic strawberry basket
- Pipe Cleaners bent into different shapes
- String tied in a loop to a stick - now dip in mixture and run!
- Flyswatter
- Slotted Spoon
- Frozen juice can with both ends removed
- Six-pack plastic rings
- Funnel
- Wisk
- Cookie Cutters